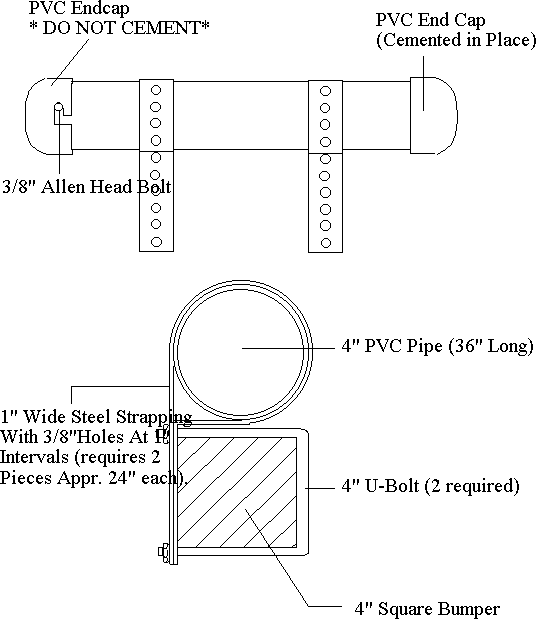
HOMEMADE SEWER HOSE HOLDER
Instructions and drawing contributed by Larry AdamMaterials Needed:
1 – 36", 4"PVC Pipe
2 – 4", PVC End Caps
1 – 5’ Length of 1" Wide Galvanized Steel Strapping with 3/8" Holes Spaced At 1" Intervals.
2 – 4" U-Bolts with a 5" Reach (minimum reach) with 3/8" Threads
4 – 3/8" Nuts for U-bolts
1 – 3/8" Allen Held Bolt with a Round Head
Small amount of PVC Cement (for 1 end cap)
Tools Needed
Saw to cut PVC pipe if over 36" (or the length you plan on making holder).
Drill and tap to make standard 3/8" course threads.
Allen Wrench
Drill
3/8 drill bit
Dremel Tool or a small saw (to cut locking notch in end cap).
Sandpaper
Primer and paint if you wish to paint brackets.
Wrench for U-Bolt Nuts
Hacksaw
HOW TO BIULD THE HOLDER
- Cut the 4" PVC pipe to the length you wish to have inside clearance for.
- Drill several holes in what will be the bottom of the holder. Keep the holes close enough to the ends so you can reach them inside the pipe to sand off any burrs from drilling the holes.
- Cement one end cap on the end that will be opposite the end you load and unload the hose from).
- Place one U-Bolt in a vise.
- Place the steel strapping over the U-Bolt threads about 1" from the using the first hole available and with the balance of the strapping pointing upward. You may need to open the required holes using a 3/8" drill.
- Lock the strapping in place with nuts.
- Bend the strapping down over the top of the U-Bolt at a 90-degree angle to the rear where it is over the threads.
- Hold the piece of PVC pipe over the strapping (a helper would be nice) so that the pipe is positioned about even with the outside of the U-Bolt.
- Bend the strapping around the PVC pipe and down the back of the U-bolt.
- Determine the best holes to use to keep the strapping tight and mark where you need to cut the strapping off so you have enough to go over both u-bolt threads (you will be sandwiching the bent over end of the strapping over the section you locked in place with the nuts in step #5.
- Repeat the processes in steps 4 to 10 to make a 2nd strap assembly.
- Remove the locking nuts and strapping for the u-bolts (and paint if you want).
- Use course sandpaper or some means of getting a little material out of the inside of the second PVC end cap. If you don’t the cap will go on but become too tight to get back off without a hard time.
- Determine where you wish to have the locking pin located (I put it facing straight back).
- Place the end cap on the pipe to where it will be when the holder is closed up.
- Drill a hole through the cap and pipe using the drill required for the 3/8 tap. This will be the location of the locking tab (the 3/8 Allen bolt) about 2" in from the edge of the cap.
- Remove the cap and tap the hole in the pipe with a 3/8 tap.
- Hold the Allen bolt alongside the pipe and determine where to cut it off so it will not stick through the inside of the pipe (this could easily cut your hose).
- Insert the 3/8 Allen bolt and just snug it down.
- Take the end cap and using the hole you drilled make an "L" shaped notch about 1" long.
- Test the locking notch to see that the cap goes on and then rotates a bit to lock it in place (take your time and remove a little material at a time so you do not make the notch too big).
INSTALLATION
- Determine the location you wish to mount the holder on the 4" square bumper (it should be above the bumper but can go wherever you wish to mount it).
- Place the u-bolts over the bumper from the rear (so the threaded ends face the trailer body).
- Slide the strapping piece over the PVC pipe.
- Place the first strapping piece over the u-bolt and press the second end over and install one nut (it should take some work to get the second end of strapping on the u-bolt to ensure it tightly holds the pipe in place).
- When you have both pieces of strapping in place and the pipe is oriented so the drain holes are facing down, then tighten the bolts with a wrench. Make the nuts good and snug but do not overtighten and severely deform the strapping.
- You can, if you wish install a small length a thin chain (or some other means of keeping the cap for being lost) by attaching it to the outside face of the cap and to the u-bolt.
This holder took me about two hours to construct and another &#frac12; hour to install. The mounting is very solid and the holder will prevent to hose from being damaged when pulling it out and pushing it back in. Total cost for the project is about $25 based on purchasing a 5 foot length of PVC pipe and other materials listed above.
DRAWING OF HOSE HOLDER
