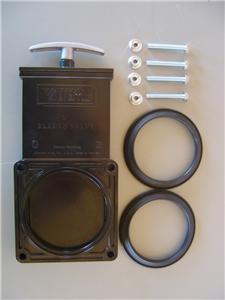
RV waste valves
Replacing the RV waste valves is not overly technical ... the gray water and the black water waste valves are identical other than size.

Be sure to thoroughly empty and sanitize the tanks and valves before working on them. Several products are listed below that will help with the dumping and rinsing procedure. If the valve has failed in the closed position and you are unable to dump the tanks, you will need to have a septic service come in to pump the tanks out.
Wear protective gloves and work in a well ventilated area, ideally within reach of a wash down hose and a drain area in case of "accidents".
There are 4 nuts and bolts that squeeze the valve between the two flanges. Depending on the valve placement, they can sometimes be a tight fit or difficult to access. Also, care must be taken to not put undue stress on the tank fitting which may crack it.
There is a rubber seal on either side of the valve that fits into a groove in the valve body. I use a little dab of Vaseline to help hold these seals in position while assembling the valve to the valve flanges. The valve is installed in the closed position to help keep these seals in place. The nuts are tightened securely but need not be overly tight as the seals are what make the water tight connection.
Valve failure is often caused by corrosion between the valve operating shaft and the hole that it slides through. A spray of silicone lubricant every so often helps.Recommended Products
Finally put an End to Dump Station Line-ups!
Introducing the Flojet 12 volt sewage pump
Empty holding tanks through a garden hose into a portable tank, toilet, sewer clean-out port or septic tank.
This portable macerator pump connects directly to RV waste outlet. Lets you dump over longer
distances and uphill. Flushing inlet-valve lets you back-flush tanks. Hand-held remote on/off switch with 6'
cord. 12-volt pump features run-dry protection. Easy clean-up and storage in plastic carry case.
A few customer comments:
- Hold the calls, we have a winner! - May 21
- No more sewer hoses/connections to deal with!!!! - April 16
- Works Like A Charm, Black or Gray Tanks - No Problem - January 17
- I'd be lost without it - November 24
- This unit is really works GREAT!!! - August 22
